Monday 16 November 2015

End of Disaasembly and off to Metal


So thats pretty much it. I finished today removing the dash vinyl and instrument hood, which of course revealed even more rust. I'm really starting to hate rust on a visceral, primal level. People say that no 356 ever is rust free and I am begining to believe them. This time around it was the bad seal around the windscreen on both sides. Something that we will have to deal with starting next week when we move the Beast (she has a name now by the way) off to metal.


Most of the restoration site stress do not skrimp on the metal work. I confess I am a bit leery about all of this. Sandblasting tends to warp the larger panels by heat build up. Modern methods of metal cleaning seem to include walnut shells, glass, plastic and old banana being sprayed at the car. I've spoken with a few blasters around here in the Land of Pickup Trucks and been very unimpressed. A Chevy Truck with a girder for a frame is one thing but 18 and 20 gauge from dies built after WW2 and cheap steel are another thing entirely.

At least I'll be in the process for the next few weeks and able to project my opinions if required.

More pics from End of Disassembly below.


Above is the back of the car. The metal feels good and strong but when I took off the piece of vinyl at the top edge, the metal came apart in my hands. Sigh

Below is the engine compartment. Not too bad. I've elected to leave the engine and rear light looms in place. Trying to get them through the tunnel is a mind boggling exercise. We'll see how we get along with that. I've also left the loom in the front as well. Another reason to have a tame blaster.


Finally,the back of the passenger compartment and engine bay looking forward. Again not too bad.


Theres a lot of bad that I haven't shown. Better not to dwell on them at this point. Next week will reveal all.

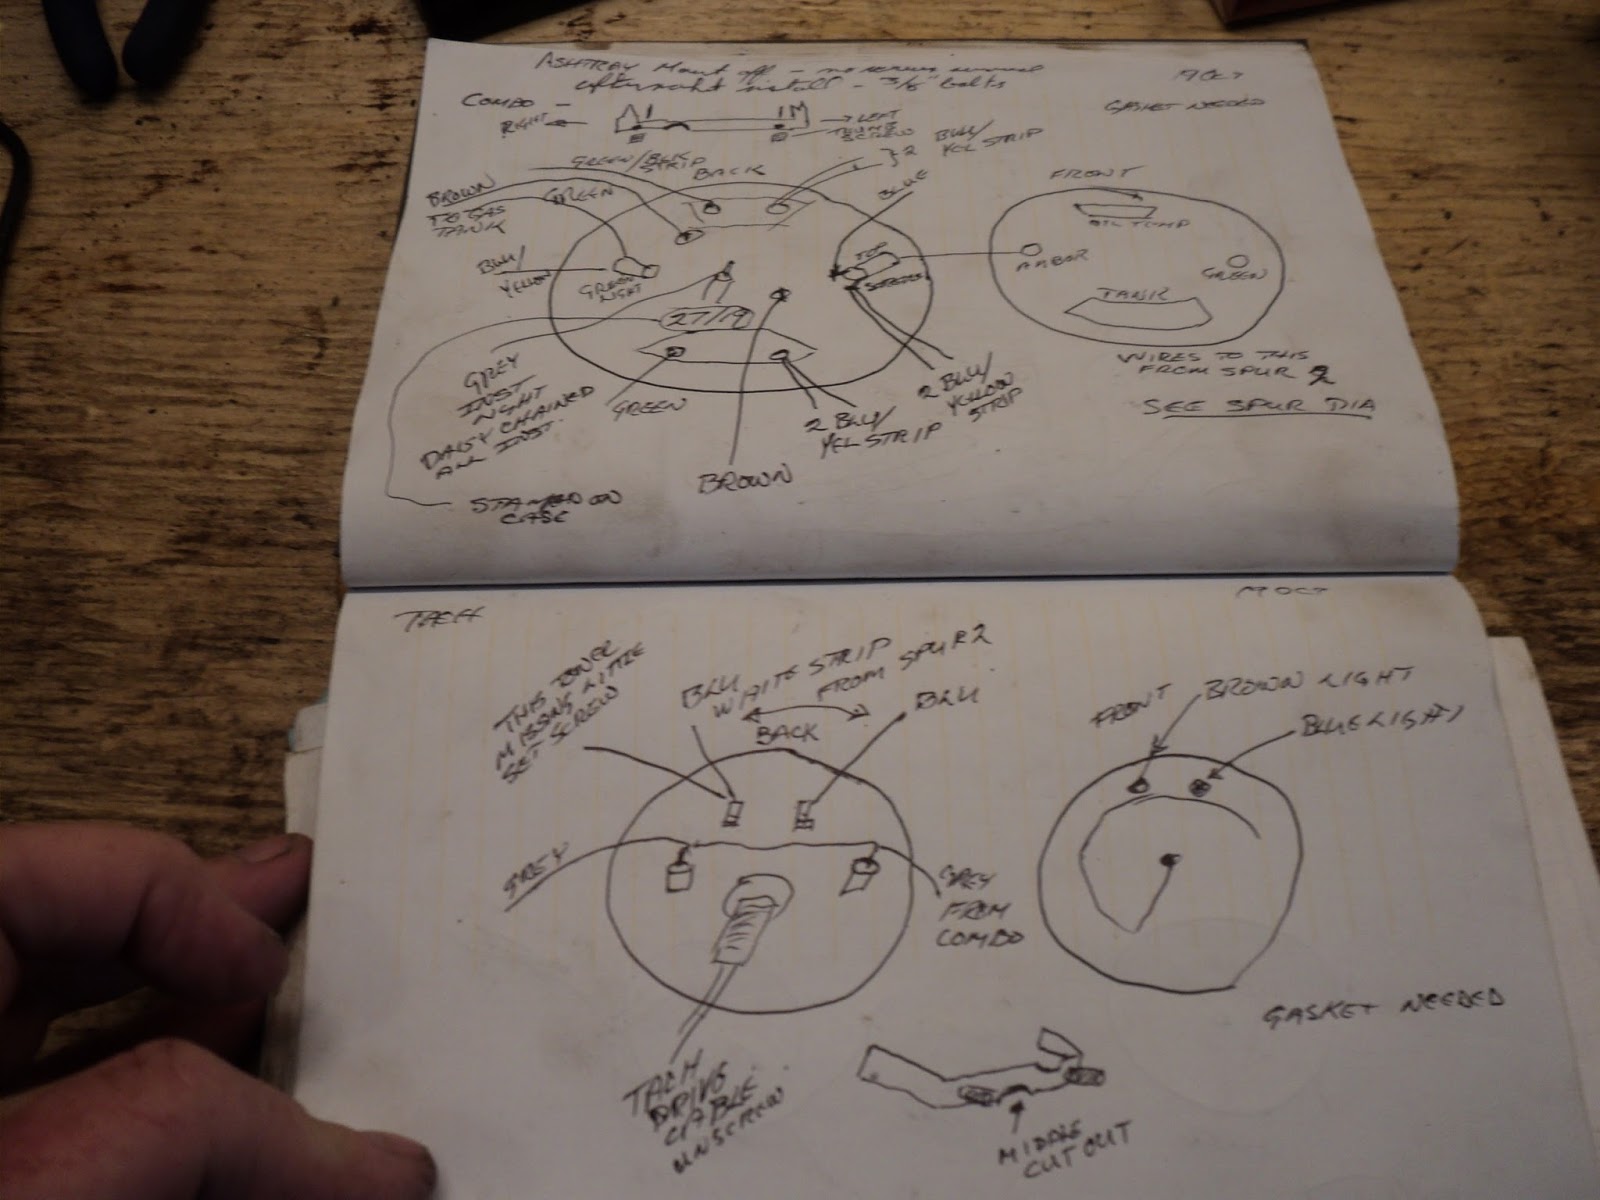
I hope to blog every day during the metal. As I mentioned, taking the car apart has been enjoyable. Everything is bagged and tagged. Notes and photos in abundance.

BUT, next week the real work starts. It will be, well, interesting.

Full updates going forward (since I will mostly be standing around the shop with little to do except advise. Sigh. And Pay, of course.

Watched Brazil last night. I am rather glad this season is almot over. Hasn't been a great one. Of course the new world champion did manage to crack up his Pagani Zonda, which only goes for $3m.

Am I missing something?

Drop me a note anytime. Cheers.

Sunday 1 November 2015

A naked car


Some shots below of various activities over the past 2 weeks.

First, the top. I had thought long about removing the top. I had initially considered that I should leave it on to make sure the gaps of doors, bodywork and windows were all correct, but in hindsight (and also noting the fact that a replaement top is upwards of $10k USD, I thought, perhaps, it might be kind of stupid,, so off it came. Damage was really not too bad, although the pirvot plate on the left side door pillar came off in my hands through the rust.


Apart from that, no major dramas. In fact, most of the disassembly has been rather straightforward. The Porsche manual, Ron Rowlands book and some of Kellog's book make the process enjoyable.

Next the windscreen. There are many articles on the Registry about this removal, people losing fingers, fingerprints, other bits of anatomy, much swearing, etc. But in this case it was ridiculousty straightforward.

The oringal windscreen has long gone, some time before 1969, and was replaced byt a screen from a long defunct company, Shat-R-Pruf. This screen is about 1/4 inch shorter than the original Sigla glass which accounts for the balls up caulking on the front, but considering all of the original repair work was done in the 60's with existing technology, it really wasn't that bad a job. Putting it back together will be most interesting though.

Swoopy looking car minus windscreen:


The long struts down either side of the dash came out without any issues, and the nuts jolding them underneath came off remarkably easy.  There is a tension rod in the middle of the screen which need to come out as well.

As a followup, all of the electrics under the dash are now out, wrapped in foil and race tape and tucker up under the dash. I tagged all of thw ires prior to this as well as finalized the schematics. The foil should give some protection during the metal work, and the wrap protects the tags on the wiring. If those come off, I am hooped.


So, as a quick and dirty update, thats where we are. The car is coming into final disassembly, parts cataloged, many diagrams, thousands of pictures and 50 pages of notes, so far.

Disassembly is very straightforward, just requing a bit of thought, heat, note taking and lots of PB Blaster.

The interesting part will commence in 3 week with the sand blasting. Full pics of that and the reassembly going forward.

Cheers,

Mexican Grand Prix tonight,, off to the beers.

Under a bit of pressure

A few weeks have passed and with the metal work scheduled for Nov 21 to start, I suddenly realized that some things, well, a lot actually, still need to be addressed.


First up on the must do things list was the removal of the instruments and wiring, so in the past two weeks I have basically spent more time on my back than a Thai hooker. As noted previously, electricity is generally not my friend, To overcome this intellectual deficiency, I have spent an inordinate amount of time taking pictures :


That's the back of the combo gauge by the way. Below is the back of the wiper switch and the accessory port.


But, since the wiring diagrams are, most helpfully, in black and white, I basically documented the entire under dash experience using the pencil method. An example of this is below:


When writing good technical manuals, something I used to do, the primary objective is to write to the level of the lowest common denominator, which in this case is me. Hence the somewhat oversimplified diagrams.

Thus far all of the instruments are out, wires tagged and bagged (I will remove the dash loom during metal), and just finalizing some final schematics during the next week. But, I should be pretty comfortable knowing I can put all of this back together.

All I do know is that as this is a 6 Volt system car and we need to account for all of them,, the volts I mean. (still not quite sure what an Amp is but they are apparently quite painful)

Anyway, for the more mechanically inclined, we also managed to remove (ta da) the pedal set.

It was a bit of a bitch but the most amazing thing happened, the 3 mounting bolts for the base plate came out, without swearing, hate, heat, etc. The clutch cable was interesting as I spent 2 hours under the dash undoing the cable one flat at a time. Must buy ratcheting wrenches. The cable comes off the right side of the assembly and routes back through the tunnel.


So, as at this point we are trying to get all of the bits and pieces off,, still much to do, More next time.


Gratuitous pic of Stella the shop dog,


Friday 9 October 2015

The following happened between 15 April and ,well, now

Keeping this blog up to date has been a bit of an issue over the summer, what with many landscaping projects, staining of decks and many other homey projects (none of which were exactly first priority for me,, but....) but as we now have a hard date for the metal surgery (Nov 23), I did manage to get a few things done. (and a visit to the old country, Bangkok)

When we last wrote, I had managed to get the engine removed with out too many fatalities. I had even received the COA from Porsche (see the identification section of the blog). The next item up was removing the internals of the doors.


Above are two pics of the doors with the door internal skins removed. Ron Rowlands book seemed to make a major point of problems and alternate methods of removing the internals but it was fairly straight forward. Even the bolts were fairly easy to remove. The fuzzy strips at the top door edges died during the attempt but the carcasses will be used for replacements.

Door Internals on the bench:


An interesting thing was the Porsche inspector's initials and the '23' door stampings on the door near the window actuator. (same on both doors)


That's another item to add to the identification section of the blog. But it does seem that all of the bodypanels are stamped 23 (87823) and the gearbox, engine, etc. are all as specified in the COA.

Also, bodywise, was the removal of the door and rear deco and spears. All managed to come off the clips (ok, well a few clips died) with out any drama. But here will be the worlds supply of parts cleaning when this dissassembly is done.

As I mentioned, this is a blog catchup. No major dramas so far in the disassembly. The parts match, a few bolts and screws have been sacrificed and the project, albeit delayed, is still moving forward. The real interesting part of this will be in the metal surgery.

I'll do another update tomorrow and chat about the shifter, seats, and radio removals. Many more pics to post as well.

The real focus over the next few weeks will be the instrument panel. Electrics and wiring are not my friend so I'll be taking more major notes on this.

As always, please drop a comment if you wish or contact me direct for any information. I have many more detailed notes on the various bits removed thus far and will be happy to share any ideas.

And if you don't want to post any comments, well, don't.

It's Friday at 4 and I am off to the pub,

Cheers
Kevin

22 April, another attempt to stay current on the blog - Engine Removal and Door Skins

Since I am useless at keeping this up to date, I need to summarize the activity over the past month,,, the engine is out (with only minor injuries), the seats are out, the carpet gone and seat mounts out (finally).

The engine removal wasn't that bad but it is crucial to remove the left heat exchanger to be able to get that top right engine bolt. On reassembly, the fix to weld on some rod to prevent it turning needs to be done.

And here she is, all original decals in place:

The jack is for ATV;s and fits very well without touching the oil strainer. Highly recommended and quite cheap at Canadian Tire.

Eagle eyes will spot the missing fan belt, which broke in 1974 heralding the cars rather long slumber.

At some point in the past (pre 69 ish) the previous owner installed a slick for the times 4 into 1 exhaust. He also managed to destroy the heat exchangers.

Not sure if I had also mentioned that the car had been the home of a squirrel for many years. As the car has gone through dis-assembly, the sheer number and places for the damn maple keys has been astonishing. Here are some cleaned out from the left side exhaust.


For the engine removal process, the factory manual and the Ron Roland sources cover most of the issues. Thus far during this phase, nothing has broken. Items for replacement though are listed and cross referenced into Stoddard's catalogue.

I will need another heat exchanger, fuel line and throttle actuation rod however,, sorry, forgot about them.

Door skins, next post.

Sunday 29 March 2015

March 29, 2015 - Whats been going on?

Well, its been awhile since we updated the blog with 87823 adventures. After a month down south (wandering in the desert and playing shit golf) and the world's supply of gardening back here in God's Own Country (2 lawns, many very big rock removals and the shifting of much dirt), we moved on with the front end dramas and we are now into the engine removal phase.

Overall we also have a target for teardown of the full chassis! The aim is for completion by end of May as the metal work and major surgery is now scheduled over the summer.

First though the front end:

Surprisingly, most of the removal, lights, grills, badging and, to my horror, the front deco strips actually came apart reasonably well. A fair amount of heat (propane) and fairly large amounts of the magic penetration fluid (acetone and ATF mixed 50/50) eased up most of the bolts, most of which hadn't moved in 60 odd years.

The RF came apart the easiest and only one or two bolts committed suicide in the removal process.

The front bumper captive bolts did just that, remained captive, so the bumper will need to be addressed during the metal work portion of the project. And, wonder of wonders, some bright spark in the distant past brazed the bumper mounts to the chassis instead of using the high bumper mount supports and captive nuts for alignment. Another joy to deal with.

The front end wiring loom presented a few challenges. The RF loom is routed through the RF fender support bracket. This connects up into the tube to the headlight bucket. After 60 years, the bracket tube was filled with crud and decision time was either the bracket or the loom. Things didn't work out well for the bracket (which was on the replacement list anyway) and Mr. Dremel was pressed into action. With the tube eviscerated, removal of the headlamp wiring was that much easier.


Above is a pic of the bracket before the Dremel meeting. The tube for the headlamp wiring is the one which bends upwards in the middle. Much of the 60 year old dirt was in the elbow.

The LF tube / fender bracket had a similar issue but with half a can of WD40 down the tube, the loom emerged unscathed. Minor cut on the right side horn ground wire will need to be replaced but overall a good result. All wiring was documented and conforms to the factory wiring diagrams.

Below are the items removed just from the front end. Ziploc bags with corresponding notes and bin locations are highly recommended. You will go crazy if parts control is not on your project list. The corresponding parts replacement list lives in a spreadsheet with Porsche part numbers against each part. This will make life much easier when the time comes for ordering.


Finally,  a pic of the RF and LF looms ready to be pulled back under the dash. Those with sharp eyesite will notice the product of the new heat gun which has done a superb job of melting the undercoat. There be virgin metal there!


Next week: remove the engine (should be interesting), followup with Porsche for the COA (8 weeks ordered!),, full report then.

 My desk, yesterday:


Wednesday 17 December 2014

Identification Numbers

One thing about these cars is the almost fanatical focus on serial numbers and the great utopia of 'numbers matching'.

I have always just wanted to get her back on the road,, the 'driver' level of restoration. But, as part of the project, some tracking of the holy numbers grail is probably warranted.

First though, a blast from the past:


Now, how scary is that. My 1973 Ontario Registration. Umm ok, a few problems throwing things away.

First the engine number:


Chassis Plate from drivers hinge pillar:


Below is a snip from an article on the ConvD site which should give us some idea of what the Beast (and she/he does have a name but that is for another post) has for original numbers:


The full |ConvD article can be found here=>

http://convertibledregistry.com/facts_info_vin_locations.html

So, on to some pics of some of the VIN locations from the above list:

 Convertible top frame (823)

Trunk Floor (87823)


Front Deck Latch (23) (you need to squint a bit)


Just under the engine cover latch (23) (you need to squint a lot)


Doors (the 23 is kind of hard to see,, squint maybe)


Transmission


Some other id numbers from the first week of teardown:

Wheels:
  • 2 marked as 2 60 (Feb 1960 manuf. date)
  • 1 marked as 1 60
  • 1 marked as 2 58 (Commerz marked on rim)
  • And 1 (spare) marked as VW which means very weird to be on a Porsche)
Some electrical numbers from the rear:

Right Rear

Tail light 
  • lens 3260 SWF logo
  • Chrome SWFk3260
  • Gasket 399843
  • Bulb CGE1129 (brake)
  • 6821 Philips (turn)
Right License light

  • Lens K12844 Hella
Right Reflector ULO K11246 No135 (and some asshole used a wrench on the back and squashed the mount)

Left Rear


  • All serial numbers identical to those above for Right Rear

Reverse Light Lens Hella 62548

And the Certificate of Authenticity from Porsche (TA DA)